


Joystick Soldering Iron Tip for PS5 Xbox One Series S & Switch Controllers Multi
Joystick Soldering Iron Tip for PS5 Xbox One Series S & Switch Controllers Multi
Key Features
- Joystick Soldering Iron Tip for PS5 Xbox One Series S & Switch Controllers Multi-hole Solder Iron Kit
Specifications
| Brand | Urqgnc |
| Product Type | TOOLS |
| Item Type Keyword | soldering-iron-tips |
Couldn't load pickup availability


- 5 stars: 7 (88%)
- 4 stars: 1 (13%)
- 3 stars: 0 (0%)
- 2 stars: 0 (0%)
- 1 star: 0 (0%)
[Color: Golden Yellow]
I can't fault this product, you absolutely have to know how to use it or else it won't work for you. Another reviewer mentioned putting some flux and a bit of solder inside the hole and that is what worked for me to get the analog sticks off my controller. This was my first experience and it was difficult however doable thanks to this soldering iron tip.
[Color: Golden Yellow]
loved it
[Color: Gold]
Great tool to have if you are repairing controllers regularly, easy to use, make sure you tin it before use!
[Color: Golden Yellow, Color: Golden Yellow]
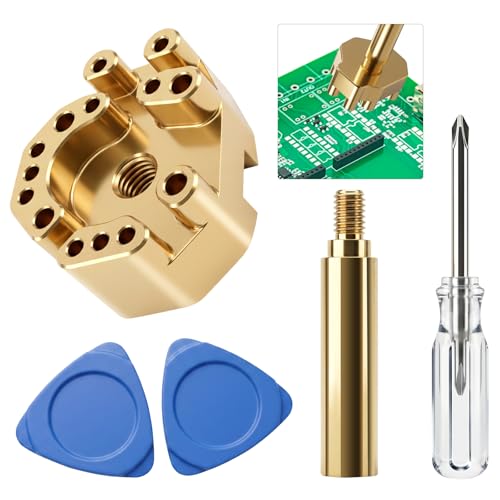
This soldering iron tip is helpful if you're going to be removing normal joysticks a lot, especially if you don't have a hot air station. Using an iron and wick or a solder sucker trying to empty each hole and then getting the joystick out is such a pain. It's nice it came with a couple of guitar pick pry tools; I always seem to go though those plastic ones pretty quickly.This tip fits on the most generic/old soldering irons that take 900m tips. First unscrew the nut of the iron, slide off the cover and the old tip, put on this tip and screw the cover back on tightly. Then spin the joystick tip onto the part you just put on and make sure it's tight. Then wait for it to heat up and when it's up to temp you can hold it over the back of the joystick, maybe wiggle it around a bit, then use tweezers to pull the joystick out.The first time I used this I thought it was the wrong size, but it turns out the joysticks I was removing weren't standard! (Thanks PowerA, I love not being able to put hall effect sticks in 😒). I later used it with a brand Xbox controller and it worked great! It should work for any standard joystick, like the kind with potentiometers on the side and a plastic stick for the joystick. If you're going to all the trouble of taking a controller apart and removing the joysticks, spend the extra couple bucks to get hall or TMR sticks so you never have to do it again for that controller. I've gotten non name-brand ones and they've worked fine.I'd suggest having 2 irons if at all possible: one with this tip and one with your favorite tip (I prefer a knife tip). After you use this tool to remove the joystick you'll need to clear the holes either with wick or a solder sucker, so it's nice to have an iron available for that so you don't have to wait several minutes for the joystick one to cool off enough to swap it. Also be aware it may not fit in your soldering iron holder so you might need another place to put it to cool.Overall I'd definitely recommend this tip for removing joysticks, especially without a hot air station. It should fit all the standard joysticks and this tip in particular is cheaper than many similar ones (less than $20!), which is why I passed on the others I was offered but got this one. Highly recommend!
[Color: Golden Yellow]
Works great. My soldering iron is a little underpowered but still worked with additional heating time.Be sure to silver the holes and use a little flux.
[Color: Golden Yellow]
Anyone who fixes modern game controllers knows that desoldering a through-hole, multi-pin analog joystick module is an absolute nightmare. Trying to clear out all 14 pins simultaneously using solder wick or a standard solder sucker usually results in pulled pads or overheating the PCB (Printed Circuit Board).This specialty joystick desoldering tip from Urqgnc completely changes the workflow. Here is an honest, technical breakdown of how it performs during controller repairs:🛠️ Design & Thermal PerformanceThe core of this tool is the porous chrome-plated copper head. Because it is solid copper inside, its thermal mass is exceptional. Copper has incredibly rapid heat conduction, meaning the moment the head makes contact with the joystick pins, it transfers heat uniformly across the entire footprint. The chrome plating prevents the solder from eating away at the copper body too quickly, extending its lifespan.🕹️ Precise Alignment & Universal FitThe tip is shaped to match the exact physical configuration of standard pot-style joysticks used across PlayStation (P4/P5), Xbox (One, Series X/S), and the Nintendo Switch Pro controller. The alignment is precise; it drops directly over the component, making simultaneous contact with the potentiometer pins and the chassis anchors.⚡ Separation Speed & PCB SafetyThe biggest benefit here is the reduction of dwell time (how long heat is applied to the board):Fast Heat Transfer: Instead of heating individual pins one by one while trying to pry the module loose, this head melts all the connection points simultaneously.Safe Extraction: You can cleanly lift the old joystick out in just a few seconds once the solder liquefies. This dramatically minimizes the risk of lifting delicate copper traces or overheating surrounding surface-mount components.📦 What’s in the BoxThe package comes with the specialized tip, a welding gun adapter to fit standard threaded heating elements, a screwdriver, and two plastic pry opening tools to assist in safely popping the controller shell apart without gouging the plastic.📌 The VerdictIf you only fix one controller a year, a heat gun or traditional iron might suffice. But if you routinely swap out drifted thumbsticks for Hall Effect upgrades or repairs, this specialized tip is a massive time-saver. It turns a frustrating, high-risk chore into a smooth, 10-second process. Highly recommended for any DIY tech bench! 🎮🔧
[Color: Golden Yellow, Color: Golden Yellow]
TLDR - this thing works if you prep right and it may be the most foolproof way to do the tricky desoldering of a joystick. Keep reading for critical tips.I have been replacing joysticks on controllers for decades. I actually have my own line of premium quality controlled joysticks, check us out if you need some replacements by searching for JAO Automation. Desoldering joysticks is a huge PITA. Even with a professional powered vacuum desoldering tool, its not always easy. I have fabricated plenty of custom iron attachments and I actually manually milled an attachment just like this one several years ago and while it worked beautifully, I could never make the economics work to fabricate and sell them myself.1) Use lots of good flux throughout this process. I like Mechanic Nano Flux. Any good flux will do. Novices almost never flux enough.2) You want to lower the melting point of the OEM solder. ROHS lead free solder has a very high melting point and this makes everything more difficult. You do this by mixing in PbSn solder. Ideally 63/37 eutectic. You will improve the situation even more if you mix some solder in, remove the mixed solder with wick, and then add more PbSn solder. When you're done, you actually want some fat blobs of solder so this special tip will contact everywhere.3) Prep the desoldering tip. It's bare brass, it needs to be tinned like any tip. Your iron may vary so flux it up, keep increasing temp until PbSn solder melts on it. Throw a bunch of PbSn solder all over the face, clean up excess and spread it out with some wick. It's fine if it gets into the holes, you want a layer of solder everywhere, but not so much it's dripping or blobbed on the tip.4) You may need some extra hands now, but I found it pretty easy to do this solo by holding the controller board in my left hand and pulling at the joystick frame with my left fingers while I applied the iron with my right hand. XB1 controllers have other components around the joystick area, but as long as you are reasonably well aligned, you'll be fine. Add a lot more flux to the board. Line it up and press the desoldering tip against the board. You may need to adjust your positioning (slide it around) SLIGHTLY to hit all the solder points, but not too much. The tip has a boat load of thermal mass so it should free up the joystick pretty fast. The joystick frame will get hot, but it should pull out within 10 seconds or less if you are lined up with all the pads. Don't force it out, don't pry it out. If it doesn't pull out, stop and let the board cool down for a second, prep everything again and try again.5) Clean up your now empty through holes with some flux and wick using a standard iron. Clean the flux, inspect for any pad/trace damage and as long as nothing is damaged, you should be good to solder a new joystick in.Please check our line of joysticks by searching for JAO Automation. We test accuracy on every single joystick and we are the only manufacturer who actually publishes tolerances for accuracy.
[Color: Golden Yellow, Color: Golden Yellow]
This joystick soldering iron tip is a great accessory for anyone who performs controller repairs or joystick replacements. The tip appears to be well made, with solid construction that gives confidence during detailed soldering work. It arrived in good condition and includes an adapter, which is a nice addition because it helps with compatibility and makes the tool more convenient to use. The overall quality feels reliable, and it looks like it is designed specifically for the precision required when working on small electronic components.During use, the tip performs exactly as intended. It heats evenly and provides good control when working on joystick replacement jobs, making delicate soldering tasks much easier. The specialized design allows better access to tight spaces around joystick assemblies than a standard soldering tip, which helps improve accuracy and reduces the chance of disturbing nearby components. The included adapter fits well and makes setup quick, allowing the tool to be put to work without unnecessary modifications or additional accessories.This is an excellent tool for electronics hobbyists, repair technicians, and anyone interested in maintaining or repairing game controllers. Whether replacing worn joysticks, fixing drifting analog sticks, or working on other precision soldering projects, this tip makes the process much more manageable. The build quality is good, it functions exactly as expected, and the included adapter adds even more value to the package. I have been very pleased with its performance and would happily recommend this joystick soldering iron tip to anyone looking for a dependable accessory for controller repairs or other fine electronics soldering projects. It is a practical tool that earns a permanent place in any electronics repair kit.